Get started with Hook: from sign-in to your first campaign
A 15-minute first-run walkthrough that takes a new org admin from passwordless sign-in to a launched phishing campaign and a readable executive summary.
This guide takes a brand-new org admin from a fresh inbox to a launched phishing campaign and a readable report — about 15 minutes if you have your pilot users handy. By the end you'll have a live simulation running against a small group and know exactly where the results land.
Hook sign-in is invitation-only: your account has to be provisioned before you can log in. If you're an MSP managing multiple client orgs, the flow is similar but starts in the MSP portal; org admins start here.
Before you start
You'll need:
- An invited Hook account. Sign-in is invitation-only — your CSM or an existing admin provisions you first. If you've never been invited, the login page will reject you (see Common pitfalls).
- Your work email at the domain your team uses for Hook.
- A short list of pilot users — 5 to 10 teammates who know they may receive a simulated phishing email.
- About 15 minutes of uninterrupted time.
Sign in
Hook uses passwordless sign-in by default. You enter your work email, Hook emails you a one-time code, and you paste it back in the browser. A password tab exists if your account has one set, but OTP is the default.
Open the login page
Go to app.hooksecurity.co. The screen reads Welcome back, and the OTP Code tab is selected by default. The second tab, Password, is for accounts that have a password set.
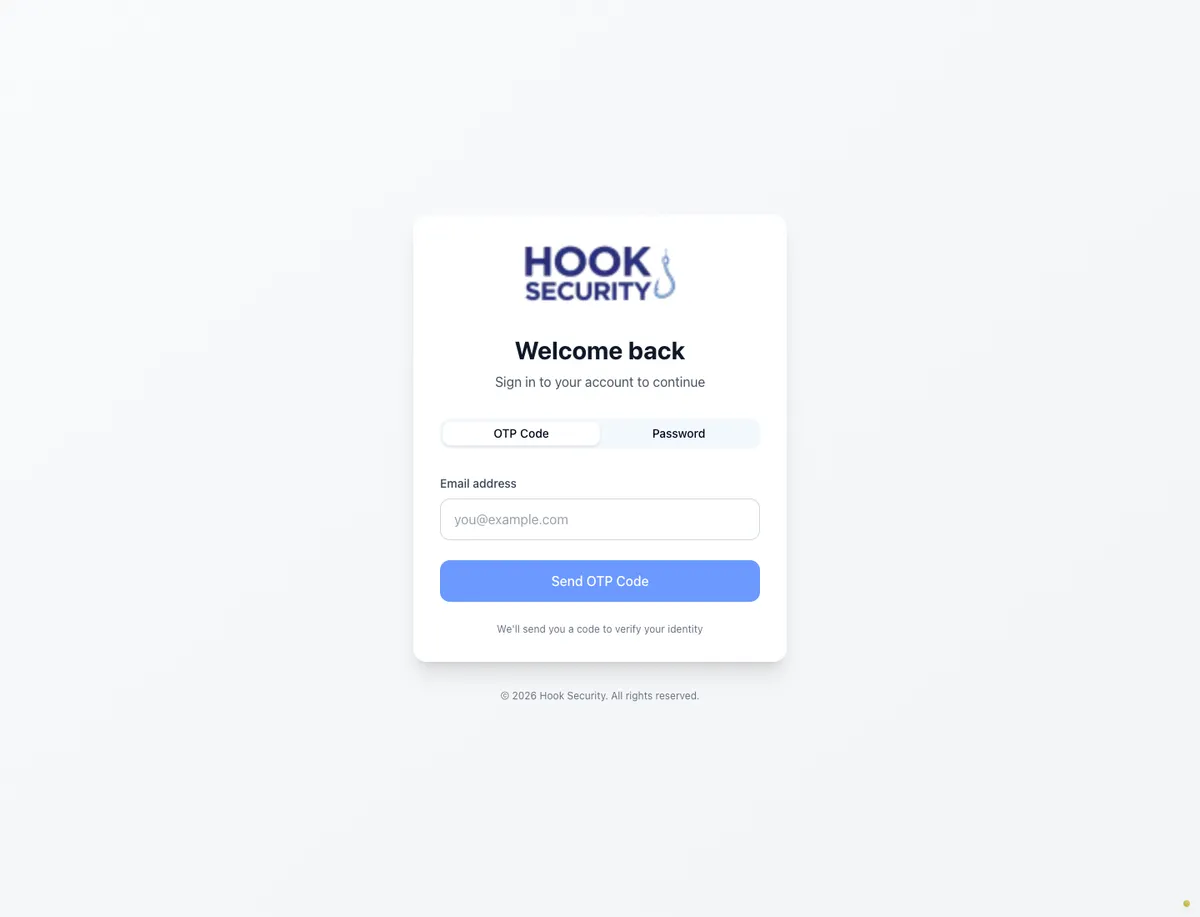
Request a code
On the OTP Code tab, enter your work email and click Send OTP Code. Hook always advances you to the code-entry screen — it won't tell you whether the email matches an account, which keeps attackers from probing who has access.
Enter the 6-digit code
Open the sign-in email, copy the code, and type it into the code field (the label reads Enter the code sent to your-email). The field accepts exactly 6 numeric digits (non-numbers are stripped as you type), and Verify Code stays disabled until all six are entered.
Codes expire — resend has a cooldown
If the code expires or doesn't arrive, click Resend code. There's a 30-second cooldown between sends, shown as a countdown ("Resend in Ns"). Use Use different email to start over with another address.
This portal is for admins, not learners
Every successful login lands in the admin portal — there is no learner experience here. If you're an employee trying to complete training, you belong at school.hooksecurity.net, not this app. An account that exists but isn't an active console user is rejected with a message pointing to the school site. See Troubleshoot sign-in if you're stuck.
After a code (or password) is verified, Hook finishes the login on the
server, then sends you to /msp. If your organization isn't an MSP — most
org admins — the MSP layout immediately bounces you on to /org, your
dashboard. You don't need to do anything; this hop happens automatically.
Land on the org dashboard
You arrive on the Dashboard at /org. The header reads Your
organization's security awareness at a glance. This view is currently
read-only — its data is synced from your existing Hook environment, and
the dashboard's own FAQ explains that campaign management is rolling out in
phases. You'll launch campaigns from the dedicated wizard, not from this
page.
The dashboard has six regions, top to bottom:
- Four metric cards — Total Users (with group count), Campaigns (active vs. completed), Training Completion (average rate and overdue count), and Courses Assigned (total and in-progress). Each card links to a relevant report.
- Recent Campaigns — a table of your latest campaigns with status and date; each row opens that campaign's executive summary. Shows No campaigns found on a fresh org.
- Training Status — overdue / in-progress / completed bars. Shows No courses assigned until training is enrolled.
- Autopilot — the status of automated Phishing and Training services. If nothing is on, it reads Automated security training is not active. Contact your service provider to enable Autopilot. The Training row currently shows a Coming soon badge and isn't clickable yet — only Phishing Autopilot is live.
- Quick Actions — four shortcut cards: Autopilot, All Reports, Executive Summary, and Course Completion.
- Frequently Asked Questions — an accordion covering what the platform is, how it relates to Hook 1.0, and why it's read-only today.
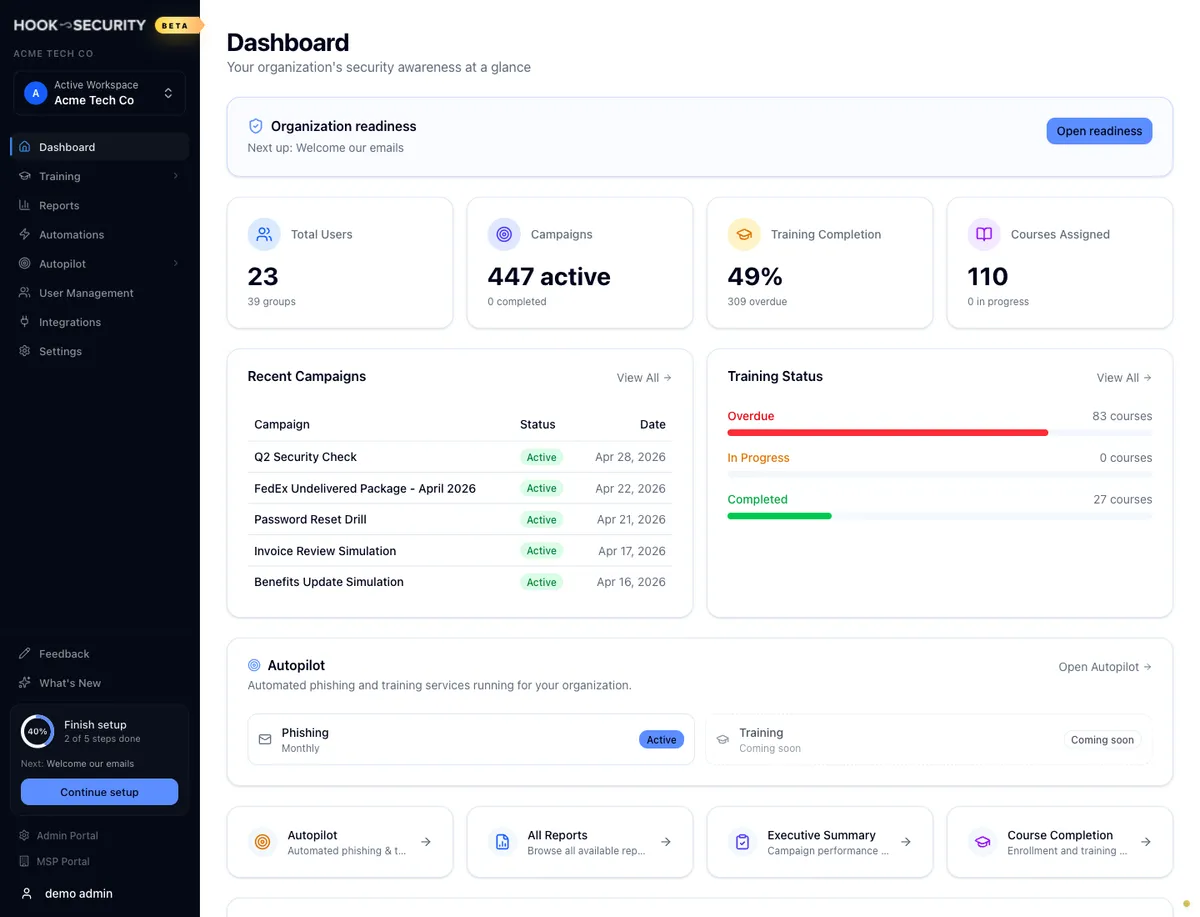
A first-time org shows zeroed-out metrics and empty panels. That's expected — you're about to put data into them.
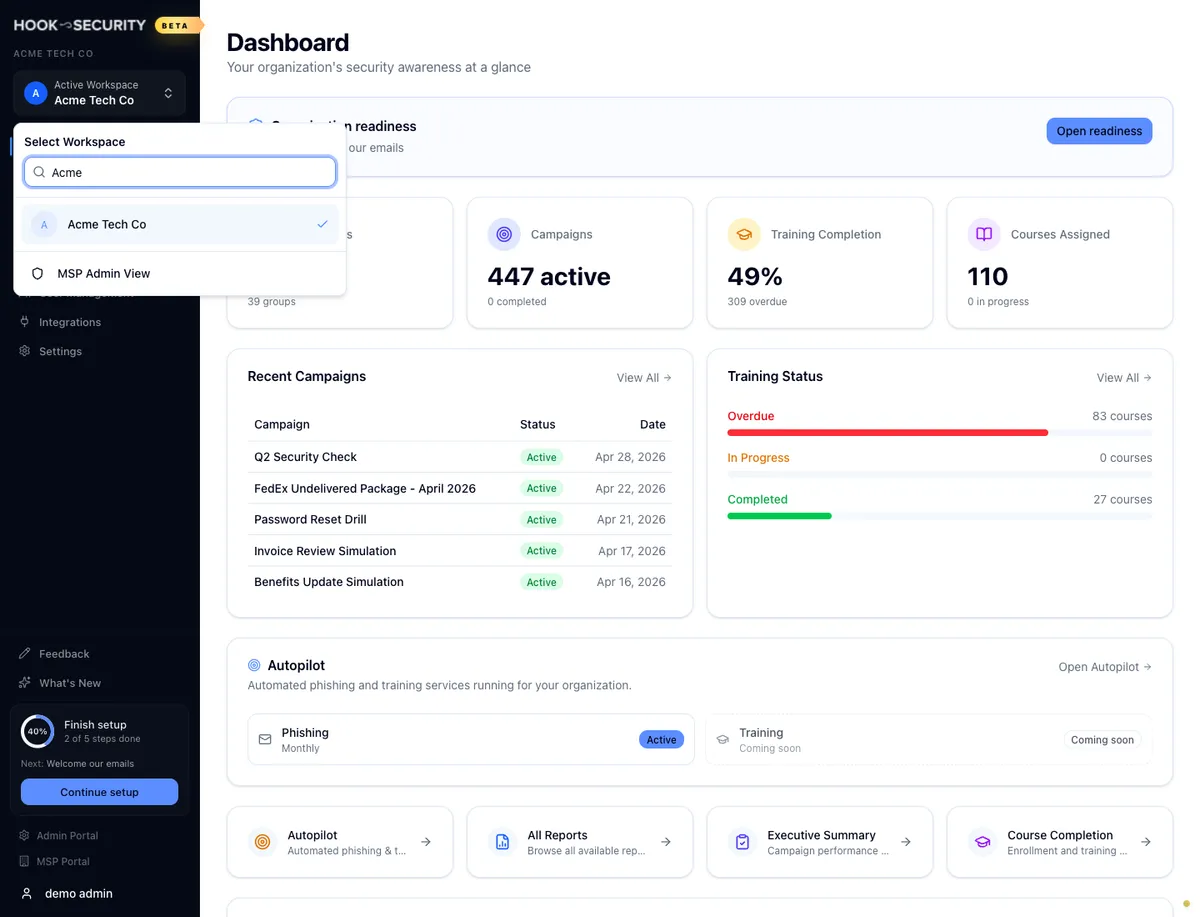
Confirm the right workspace is selected
Before you do anything, look at the org switcher at the top of the sidebar. It shows an Active Workspace label above the current organization's name. If you only manage one org, it's already correct. If you manage several, double-check it now — every action you take (campaigns, reports, user views) applies to the workspace shown here.
To switch, click the switcher to open Select Workspace, search by name, and pick the org. Your choice is remembered for the session, and the dashboard reloads its data for the new workspace immediately.
The wrong workspace sends emails to the wrong people
The workspace selection is the single most common thing to get wrong on a first run, especially for MSP-affiliated admins. Confirm the Active Workspace name matches the org you intend to test before you open the campaign wizard.
Find your way around the sidebar
The left sidebar is your map: Dashboard, Training, Phishing Sim, Reports, Automations, Autopilot, User Management, and Integrations, plus What's New near the bottom.
A fresh org may see fewer sections than this guide shows
Most sidebar sections are feature-flag gated. On a brand-new production org, Training, Phishing Sim, User Management, Integrations, and Autopilot can each be hidden until enabled for your organization. If a section named here isn't in your sidebar, it isn't turned on yet — that's expected, not a bug. Ask your CSM to enable what you need.
For a section-by-section tour, see Navigate the org portal.
Confirm your pilot users
Open User Management from the sidebar (/org/users). User data syncs in
from your identity provider and existing Hook environment — you don't add
users one at a time in this portal. For most orgs that means one of two
paths:
- Microsoft Entra (Azure AD) — the recommended path for ongoing sync. See Sync users from Microsoft Entra for the connect → pick groups → preview → confirm walkthrough.
- Existing Hook sync — if your CSM already loaded users for your org, they appear here automatically. Confirm the count matches what you expect.
For the 15-minute path, just verify a handful of pilot users are present and grouped together (or in a group you can target).
Warn your pilot group first
Before launching anything, give your pilot users a heads-up that they may receive a simulated phishing email. Surprises erode trust; learning moments don't have to.
Launch your first phishing campaign
From the sidebar, open Phishing Sim → Create Campaign
(/org/phishing/campaign) to start the four-step wizard. Keep this
first run small.
Campaign Details
Enter an internal Campaign name — it's never shown to recipients.
Something like Q2 2026 Pilot — Acme works. Add an optional description,
then leave launch timing on Launch now (Schedule for later is marked
Coming Soon) and the delivery option on Send at campaign start.
Targeting
Choose Include specific groups and pick the pilot group you confirmed above. The summary cart updates with an estimated recipient count — keep it to 5–10 for the first run.
Template
Browse the template library and pick a low-difficulty stock template. Use Preview to see the email and landing page as a recipient would, then select it. No custom edits are needed for a first campaign.
Review & Launch
Confirm the name, recipient count, and template in the summary, then click Launch Campaign. A toast confirms the launch and how many users were targeted ("Campaign launched! Targeting N users."), and Hook drops you on the live campaign detail page.
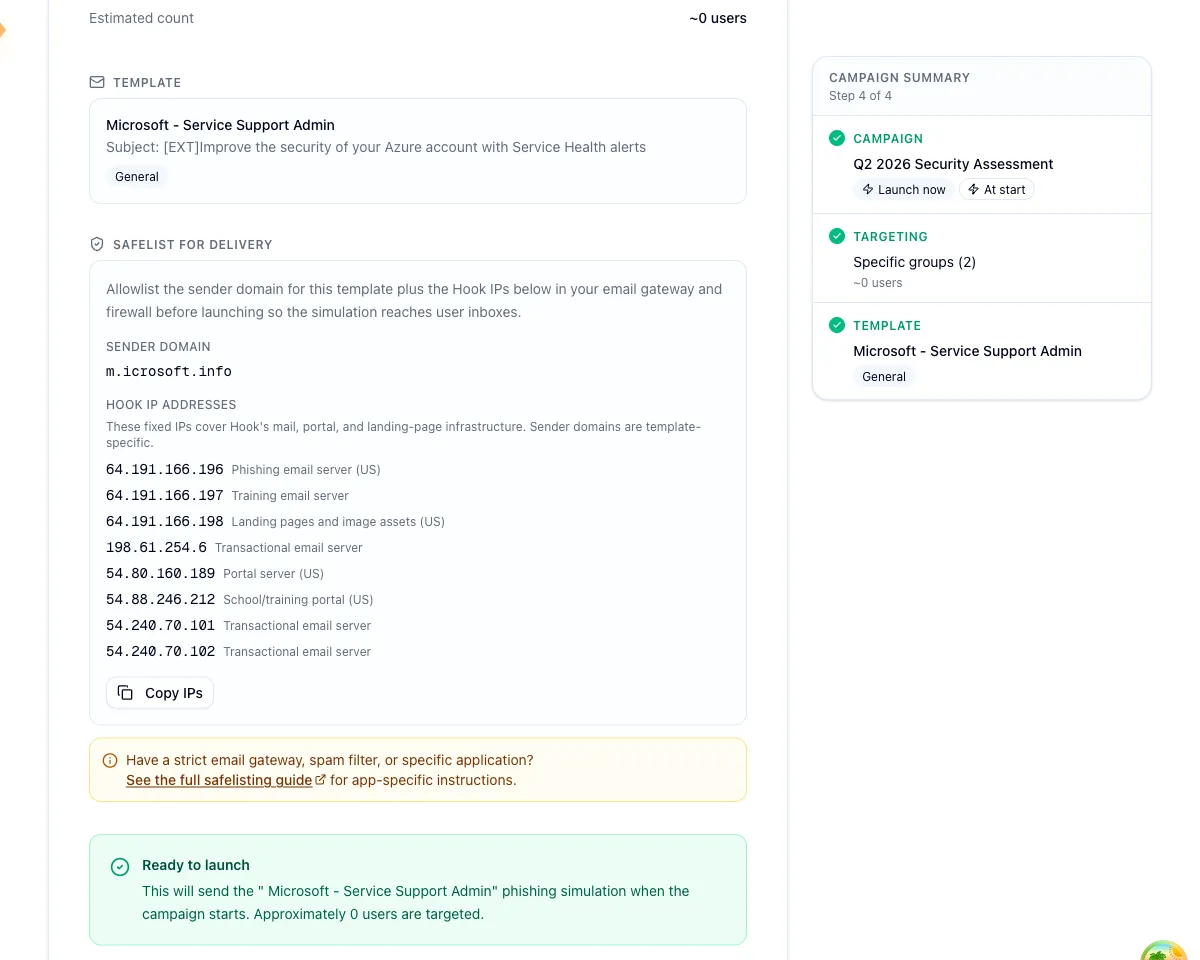
For the full walkthrough — scheduling, one-off message edits, saving custom templates — see Run a phishing campaign. To watch a campaign as events arrive, see Monitor a live phishing campaign.
Read the executive summary
Sends roll out over a short window, and engagement (clicks and reports)
begins trickling in within minutes. To read results, open Reports from
the sidebar (/org/reports) and choose Executive Summary, or click the
campaign's row in the dashboard's Recent Campaigns table.
The Executive Summary leads with headline metrics — Total Employees, Click Rate (with a High/Medium/Low risk indicator), and Report Rate (shown once anyone reports) — then adds a risk assessment with key recommendations, AI-generated insights, a breakdown of the individual simulation tests, and a list of employees who clicked and may need follow-up training. You can email the report or export it to PDF. It's built to drop straight in front of leadership.
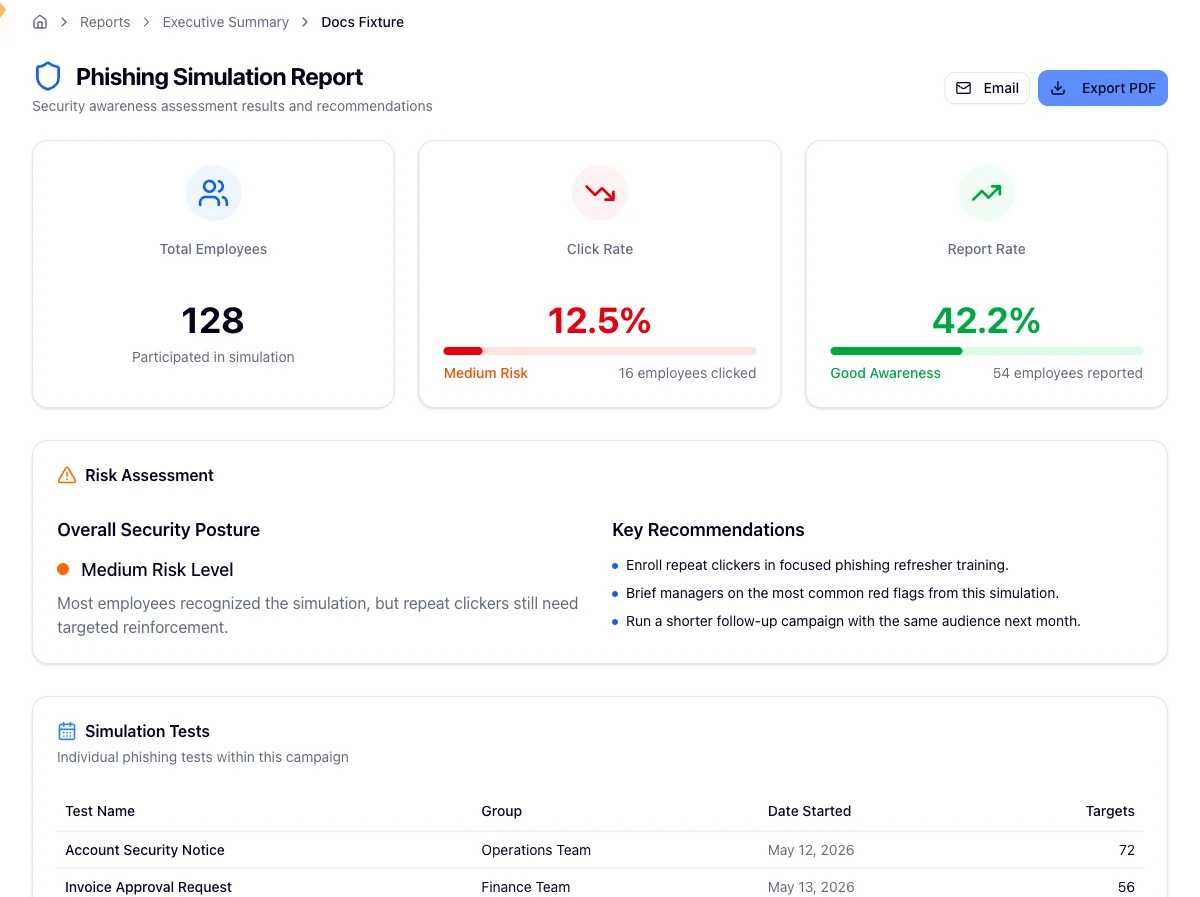
For the full breakdown of every section, see Read the executive summary report.
Common pitfalls
- "This email has not been invited." Sign-in is invitation-only. If you see this, your account hasn't been provisioned — ask your CSM or an existing admin to invite you. See Troubleshoot sign-in.
- "Not authorized" pointing you to the school site. Your account exists but isn't an active phishing-console user — this usually means you're a training learner, not an admin. Complete training at school.hooksecurity.net instead.
- The wrong workspace is selected. MSP-affiliated admins can switch between client orgs. Confirm the Active Workspace name before launching a campaign so emails go to the right org.
- A sidebar section is missing. Sections are feature-flag gated; a fresh prod org legitimately sees fewer than this guide lists. It's not broken — it's just not enabled yet.
Related
Hook concepts
The vocabulary — orgs, groups, campaigns, enrollments — that every other guide assumes.
Navigate the org portal
A section-by-section tour of the sidebar and what each area does.
Run a phishing campaign
The full four-step wizard, including scheduling and custom templates.
Sync users from Microsoft Entra
Keep your user list current automatically instead of importing CSVs.
Welcome to Hook Docs
Help center for Hook Security — phishing simulations, security awareness training, and platform guides for org admins and MSPs.
Core concepts: the building blocks of Hook
Define every core object in Hook — organizations, users, groups, campaigns, templates, courses, enrollments, reports, the watchlist, autopilot, and directory sync — and how they relate.